Showing posts with label puppies. Show all posts

Tuesday, October 9, 2012

Someone Got a Haircut

So of course, a little photo sesh ensued.

This is a typical Nollie picture with at least one ear flopped back and a soaking wet beard from dunking his face in his water bowl -- apparently he couldn't wait until after his photoshoot.  He is the happiest puppy that ever lived so the wide-open-mouth smile is also pretty standard around here, too :)


This next photo is a little blurry but I love it because it highlights his super obsessive toy behavior.  Mr. Cow Cow is his current favorite and he is seriously the first thing Nolan looks for when he wakes up in the morning or when I let him out of his crate after work.  I try to cry quietly as he jets past me to find him every evening.


Getting pampered is apparently very exhausting.  Shiloh has her spa appointment in one week so I'm sure more photos will be coming -- can't wait to have two freshly pampered pups!

Oh, and because no good post is complete without a 'before' and 'after', here is Nollie's handsome transformation -- seriously love that sweet boy face!


Wednesday, January 11, 2012

Holiday Happenings, Part 2

For Christmas this year, my sister got me the Canon  EF 50mm f/1.8 II Camera Lens -- how did she know it was exactly what I wanted?!  :)
 
It's perfect for all the close-up shots I like to take while I'm working on projects and around the holidays, it's great for creating the popular bokeh effect.  So, before taking my tree down, I decided to give it a try and came up with some fun photos.


I placed a small stool about 8 feet in front of my tree and grabbed any object close by to set on top. I took some photos during the day and some at night and think I like the effect at night better.


I even tried to get some of the puppies while I was at it. Shiloh didn't mind having to sit on the wobbly stool too much -- I know she needs a haircut and a bath! -- but Nolan just wasn't having it.


With a little more practice, maybe I can get the puppies to cooperate for next year -- and plan better with some freshly groomed little ones!

As for me and my new lens, I'm in love and using it daily -- thank you Samantha!

Tuesday, January 10, 2012

Holiday Happenings, Part 1

While looking through some recently uploaded photos, I realized there are a few holiday related items I never shared -- I think all the painting right after Christmas distracted me.  Although it's nearly mid-January, I figured this would be the last chance to elaborate before you think I'm a total weirdo for talking about such things.  First up is a rundown of all the gifts I decided to make by hand this year.  I've never made so many in one year before and I'm pretty shocked and slightly proud that I got them all finished on time.  I showed a sneak peak just before Christmas, so I thought I'd share the actual gifts and tutorials now that they're all given out and I can't ruin any surprises.

My sister had asked for some make-up brushes this year, so I thought I'd get those for her and go one step further and make her a brush roll-up to store them in. I did some google tutorial searching and came across this step by step tutorial from Sew4Home. I choose this one because 1) it looked nice, 2) the dimensions fit the brushes I'd purchased, and 3) it would give me a chance to practice my binding skills since I'd be doing it on a quilt very soon.  The rounded corners gave me a bit more trouble than I'd expected and I need more practice with that, but overall, I'd say it turned out pretty well.


 Folds up neat and tidy...


Plenty of storage for any brush you could ever own...


 And different sized compartments if you had anything larger to add in...


Once I finished the roll-up and had extra fabric to use, I decided no brush roll-up would be complete without a matching make-up case. I did more google research and came across this awesome tutorial by Skip to My Lou.  It's the perfect size to store all of my sister's make-up and her new brush roll-up.


Now that those were done, I moved on to dog collars and leashes.  My sister has been begging me to make her two puppies OU themed collars and Christmas seemed like the right time to finally give in and whip some up.  I've been making collars and leashes by just mimicking ones I already owned.  One day, I will try to get a step-by-step post up including where you can find all the necessary hardware. For now though, here are my OU themed collars for little Bentley and Bella.


There are three collars in the pic above -- Boyfriend's grandmother loves red and has a sweet little Maltese, so she got her very own collar and leash set as well. My sister likes to walk her two on the same leash and use a split lead to hook on each of their collars so by the end, I had actually made three collars, two leashes and one split lead.


And here are Bentley and Bella modeling their new gifts.  Somehow I had some extra time before Christmas to make a little bow tie for Bentley and a flower for Bella and Angelina. All of them have snaps and can easily be removed.


This next gift was made around Thanksgiving, but I figure it's close enough to the holidays to count :)  They were made for and inspired by boyfriend's love for Words with Friends...


I caught Shiloh snuggled up by them at one point and it spurred a whole puppy photo shoot -- I'll spare all the pictures I have and just share a couple.


Here's little Nolan.  The look on his face says, "Seriously, that black thing pointed at me again... can I just be done?!"


And then little Shi, who's always been so good at posing as long as you make a high-pitched noise right before snapping the pic.


This was another project that I made up as I went and put together as practice before making the quilt -- I used a similar technique when I attached the name on the quilt. So, it is on the list for a follow up 'how to' post.

And last, but certainly not least, was the quilt for boyfriend's niece. I shared my process in an earlier post but had not quilted or bound it yet. For me, the quilting was a little frustrating but the binding went surprisingly well -- originally it was the part I was most afraid of!  I followed instructions from The Polkadot Chair's quilt-a-long for the quilting part and will definitely be doing the same on the next one. For the binding, I found these instructions and they worked perfectly for me!


Since she's only 3, I put together this patch on the back so she'll remember when she received it.


Santa actually brought her a pink princess bed for Christmas so the quilt was gifted at the perfect time!  I am so pleased with it and ready to make more -- just need a little time to rest my sewing hands :)


linking up to The Polkadot Chair

Wednesday, October 19, 2011

Reoccurring Thought Today


Anyone else having one of those days? Where time seems to stand still. You look at the clock and can't believe only five minutes has passed since the last time you looked -- which you swear must have been hours ago. You stare at words on a page but can't absorb a single one. You're just ready to be anywhere else and moving on to other, more exciting things. Yup, it's been one of those days for me.

Maybe I'm just anxious for the weekend to get here...


Thursday, July 28, 2011

A Great Crate Update

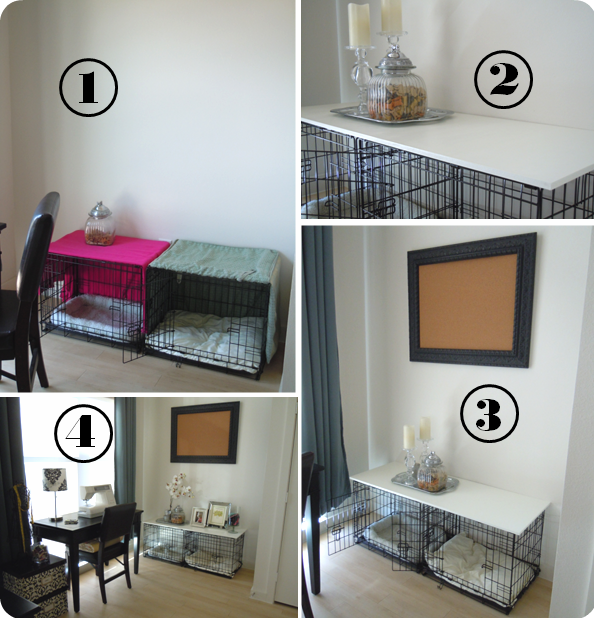
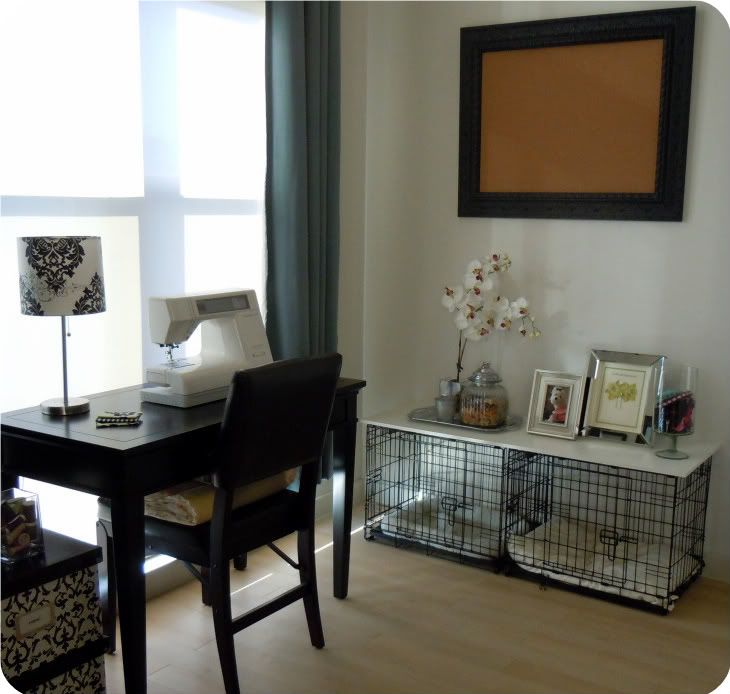
I've been making progress on the great crate project and slowly transforming this once hideous space to a slightly less hideous space.

1) the 'before' and reason for the much need crate makeovers
2) bought a piece of mdf board from Home Depot and had them cut it down to the proper size.  Because I'll be attaching fabric to the underside, I had each edge cut about a half inch bigger than the actual crate dimensions. While I was there, I purchased white paint samples, water based protective top coat, a small grit sanding block, and a tact cloth. To paint the board, I lightly sanded the sides and top, wiped it down with the tact cloth -- best dusting rag ever, btw! -- and applied a thin layer of white paint using a sponge roller. Once it dried, I repeated the whole process -- sand, wipe, paint, dry, sand, wipe, paint, dry.  I think I did this a total of three times to get the coverage and look I wanted. Then, I repeated the same process with the protective coat using a craft store sponge brush -- sand, wipe, paint, dry, repeat x3. It may have taken a bit of time doing it this way, but it looks so great and no paint has chipped or even scratched.
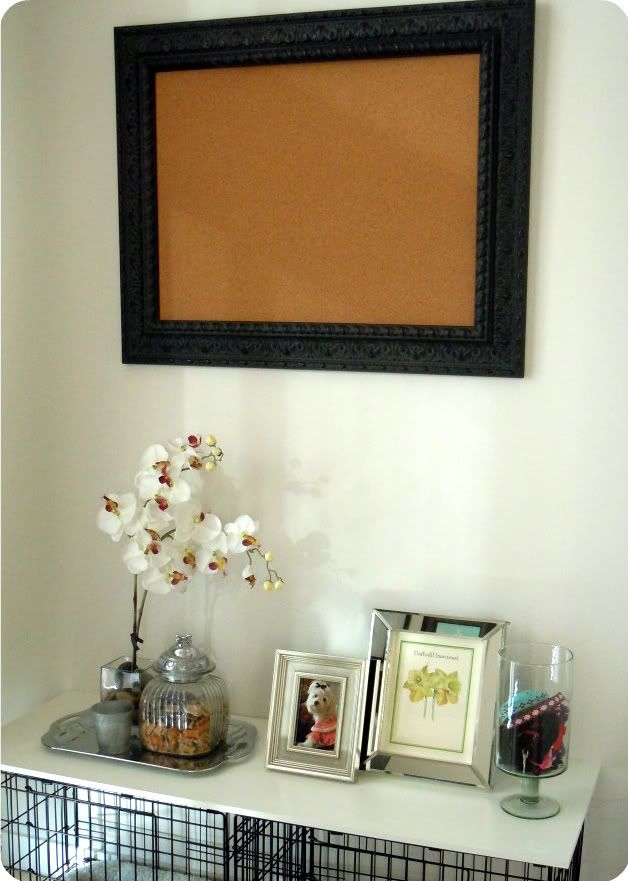
3) I found this memo board at Hobby Lobby during one of their 50% off wall decor sales -- I know these happen ALL the time, so this find is not that surprising.  Once I make decisions on fabric, I'll dress this up with some pretty colors and ribbon that coordinate with the crate covers.

4) added a few more accessories to make it look more like a table and less like a painted piece of mdf just sitting on top of two dog crates.

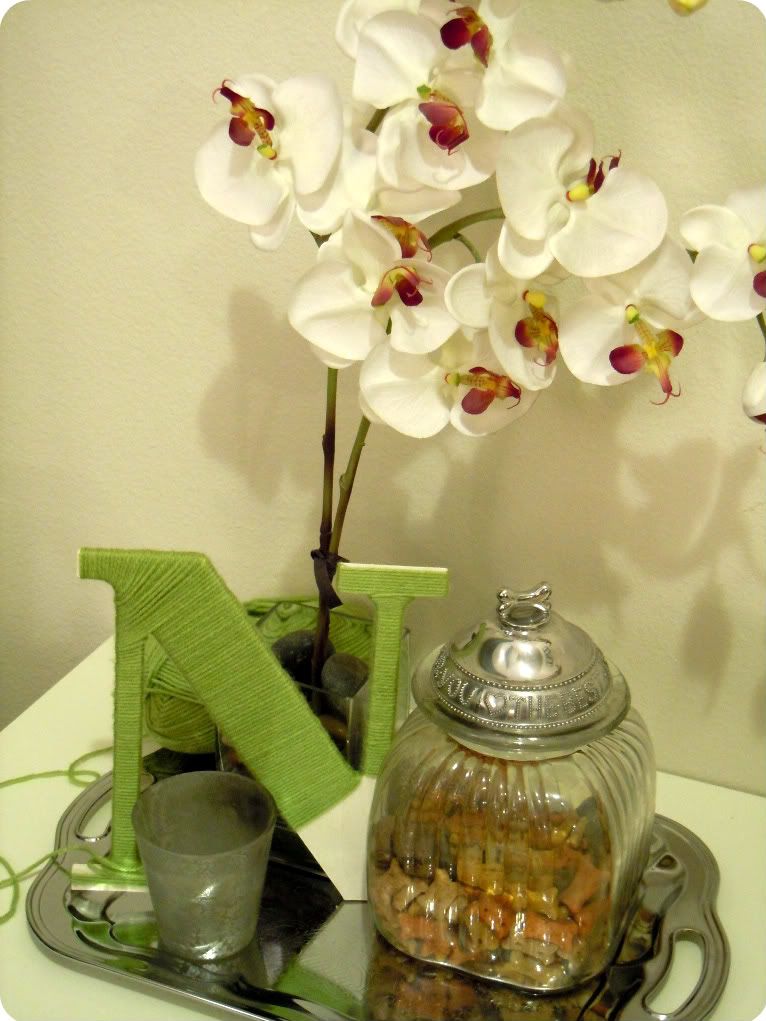
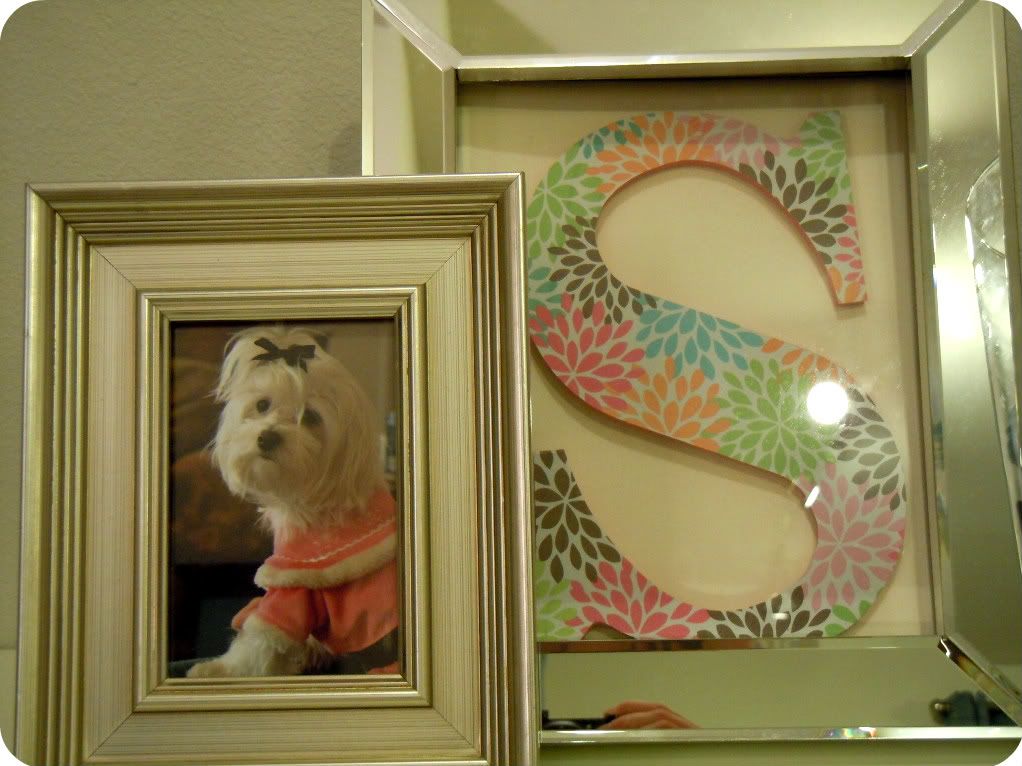
I've been working on a few other projects to personalize the space for the two pups. A sophisticated green yarn covered 'N' for Nolan...

...and a brightly colored 'S' for spunky little Shiloh. Don't be fooled by the picture below. That actually is Nolan sleeping in Shi's crate. He loves to go in there during the evenings after Shiloh has been in it all day. I guess he just likes her pillow better.

So those are the latest crate updates. I think I've finally made a decision on fabric to go around the crates, so hopefully it turns out as great in real life as it does in my head!  Best part, it will be 100% free for me!


Tuesday, May 17, 2011

The Great Crate Debate

I have a secret, hideous corner of my apartment that has never been seen by the blogging world.  I’ve shown several pictures of my sewing nook which lead you to believe it is the perfect sewing space with nothing out of place. Although I do love it and think it’s great for my needs and perfect in most ways, I have intentionally left out views of the right side of this frequently used space.  See how pretty?
Little do you know -- and little do I like admitting -- that just to the right of my desk is a very unattractive and much neglected doggie corner. Unfortunately, it is the only place I can find to keep the not-so-glamorous dog crates that I use on a daily basis -- and while the puppies are growing and well behaved most of the time, I am still not brave enough to give them free reign of the apartment while I’m at work each day. We’ve been slowly working up to a full day with a few unsupervised hours here and there, but not even close to putting those crates up for good!  Alas, the extremely unattractive but very practical dog crates must stay.  
In my very first post, I explained that there were several ways in which projects of mine get started. One of the more common reasons I tend to begin something new is “to make a necessary and/or functional item coordinate with everything else.”  So, after more than a year of neglect, I have finally decided it is time to take on the task of disguising these eye sores.  You can see how desperately they need help and why I never show this corner of the apartment... oh, how shameful! 
To make matters worse, I have to admit that Nolan’s crate is actually the pink one -- I’m a terrible mother, I know! But, in all fairness, the teal cover was made for Shiloh before Nolan came along and I could not take it away from her.  It was actually one of my very first sewing projects and used to hide in the corner of my room. You can see how pretty it is below, prior to me washing and accidentally shrinking it. Sewing lesson learned: ALWAYS pre-wash your fabric!
One option I considered for the great crate make-over is simply sewing a matching cover for Nolan’s.  The downside to this plan was that I didn’t have enough fabric for a whole second one and wasn’t sure I could still find it. Also, while I do love the cover, there were changes I would make for the second one which would leave me with creating two brand new covers and not enough fabric for either one. The more I thought about the process to create two brand new covers, the less I liked that plan.
I eventually realized that I liked the idea of having one large cover since the crates are always side-by-side.  I looked around for benches to fit over the top of both making it a functional area while also disguising the crates. Unfortunately, nothing I found fit the crates or my budget.  I had thoughts of building my own but realized I didn’t really have the space or the tools to do this in an apartment.
I thought more and more about simple ways to create a bench or table as a way of hiding the crates and finally decided on a process -- I’d like to have a solid wood top with fabric covering all sides.  It probably sounds totally nuts and hard to visualize but as the plan stands now, I’d like to get a piece of wood cut to the length and width of the crates side-by-side. I’ll then paint it to coordinate with my fabric and staple panels to the underside of the wood piece.  I also want to have separate fabric panels over the doors that can be rolled up when the puppies are in the crates, but let down to completely hide them when not in use -- essentially looking like a large bench or table.  The hard surface can act like a table top and I can set dog treats, pictures, or even a basket with leashes on top. 
Also, with fabric only around the outside, it leaves the two sides of the crates which touch completely open so the puppies will be able to see one another during the day. In my mind, I've decided they’ll love seeing one another but still be seperated and have their own space.  Here is the extremely amateur, cartoon-looking makeover that I envision -- can you tell I am NOT the proud owner of Photoshop? 
I’m still searching for the fabric and trying to determine how many yards it will require, but I’m 99% certain my love of blue / teal will be reflected in my choice. I’d also like to find a coordinating pattern for a lining that you’ll see where the teal and pink are in the picture above. In a sewing project a while back, I made pillows to fit inside the crates. Once I’ve decided on a fabric, I’ll sew some coordinating, soft, dog-friendly pillow covers to complete the whole look.
Sadly, the wall above these crates is also bare.  My 'after' vision involves something functional for sewing and other projects so I’m leaning towards a custom, fabric memo board.  I’d be able to display sentimental photos or keepsakes along with all the images I find to inspire my next project.
I hope to make some progress on all these items during the week and weekend so be on the lookout for some updates and after photos.  For now, I’ve got a promising plan in mind and am in desperate need of the perfect fabric!

Tuesday, May 10, 2011

All Grown Up

Yesterday, sweet little Nolan had his first birthday! We kept the celebrations low-key and simply sang a joyous "Happy Birthday" followed by a mini Jumbone birthday treat -- both dogs seriously go nuts for those things!


Nolan is growing into such a wonderful little boy and I couldn't be more thrilled to have him. He is always so happy and content -- whether he's playing with his bone doing spin moves, sitting with you on the couch in his unusual way, or being chased by big sissy, Shi.


I say it all the time -- because it couldn't be more true -- but he is honestly the sweetest boy that ever lived.  Happy Birthday, little Nollie!


Wednesday, March 2, 2011

I’m Noticing a Pattern

This one is not design related but does concern something I equally love. While scrolling through pictures on my phone one night, I noticed that this little guy has developed some unique sleeping patterns.
On a typical weekend day, he loves to follow his momma everywhere. When I take a few moments to be still or work on a project, he takes the opportunity to get a little rest. On days like this, I have found him snuggled up next to the coffee table, half buried under the couch for some darker and more cozy sleeping arrangements, or taking advantage of a rarely open shelf.


At night, when he has a couple lucky hours on the couch, he takes full advantage of the pillows in a typical Nolan, very non-traditional way.


Rather than pushing the pillows over and sleeping on the large, open, flat surface, he likes to wrap himself around them or lay right over the top while they stay upright.


This last photo is by far the most unusual and my personal favorite.


I'd like to think he was just wanting to look out the window, but it was dark and the curtains were closed, so the most likely explanation is that he just found this to be the most comfortable sleeping arrangement that night. 
None of these photos were action shots snapped at just the right moment to make him look like an awkward little boy. I’ve discovered, he genuinely enjoys laying in all these unique positions and stays in each one while he takes a little siesta. He truly is a goofy little pup and I hope he never changes!

Tuesday, February 1, 2011

Snow Day!

It doesn't happen often in Dallas, but once or twice a year we get lucky and snow -- mostly ice -- makes its way through the metroplex, covering everything and keeping everyone indoors. Since we live in the most unpredictable weather capital in the US, these days are often preceded and followed by 60 degree and sunny weather. So, for those of you worried about the Super Bowl, don’t be. The sun and warmer weather will be back in just a couple days -- much like it was just two days ago.


For today though, the snow is still falling and a thin layer of ice has covered the ground! It felt like Christmas morning waking up and hurriedly going through emails just hoping to find one titled, “Office Closed.”  Since I slept through my alarm this morning, finding this one was even more exciting -- if it wasn’t there, I was going to be over an hour late, and if it was there, I’d been able to sleep in and didn’t have to make my way to the office -- WIN!


I’ve only braved the outdoors once so far today. Unfortunately, having pups means going outdoors at least 3 times a day be it rain, snow, sun or shine -- so, the three of us bundled up and made our way outdoors. The stairs and sidewalks were covered in ice so getting to the courtyard was a slow and slippery chore. It was Nolan’s first experience in snow / ice and it took him a little while to find his “snow legs.” He fell over a few times trying to mark his usual spots but was not deterred. Once he got stabilized, he and Shiloh were running and playing harder than normal. For some reason, the colder and uglier the weather, the more they want to play and the more I have to plead with them to do their business so we can go back indoors!  I let them have their fun until I could no longer feel my ears and forced them back indoors. I’m already dreading the lunch time potty outing and digging around for some warmer winter accessories.  If I get bundled up enough, I’ll try to get some pictures of my little snow puppies.


But for now, I get to enjoy a cup of coffee, watch “Regis and Kelly,” and think about projects I want to tackle on this unexpected snow day!