The dimensions in the drawing are the cut sizes and the approximate finished size takes into account the *hopefully* quarter inch seem allowance -- assuming I can be somewhat accurate with each block.
Since I only needed 25 of the 42 squares, I picked out my favorite prints and started cutting my pieces. The squares-turned-bricks were a simple, single cut down the middle. Once that was done, I arranged the 50 bricks where I wanted -- mainly making sure the same fabrics weren't touching -- and then started sewing one row at a time. After I had 10 separate rows, I decided to stagger every other one so they wouldn't perfectly line up like they were in the original drawing. For example, I shifted the second row to the left by 5", cut that last brick in half and attached the small piece to the right side of that row. I did this with the 5th, 7th, and 9th rows as well.
Once that was done, I attached the first three rows together and the last seven rows. I ordered coordinating fabric for the special row and my binding and cut them to the sizes I had determined above. Before attaching them to the rest of the quilt, I decided to sew her name. I had never done anything like this before and if I messed up, I figured it wouldn't ruin the whole quilt since it was still separate and I could try again or come up with a new plan.
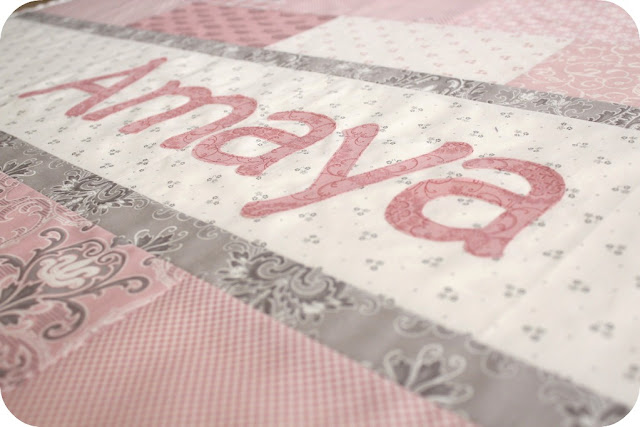
In order to attach her name, I used Heat'n Bond Iron-On Adhesive. I started by printing off letters that were 5"-6" tall from my computer. Then I traced them backwards -- using the window or glass with a light under it -- onto the rough side of the Heat'n Bond and cut roughly around each letter. I then peeled off the smooth side and ironed them on to the wrong side of my fabric, which were just additional squares from my layer cake. I then cut them out along my traced edge, flipped them to the right side and arranged them onto the white row where I wanted. To make sure they were even, I did some measuring on the sides and bottom before peeling off the backing and permanently fusing them. Then I used a pink coordinating thread to stitch along the edge to make sure they stay put through future washings. I don't have pictures of this part, but I just followed the instructions on the Heat'n Bond package and manged to get it right on the second try :)
Once that was done I attached the grey 2" strips to the name piece and then to the top and bottom portions of the quilt. It was finally looking like one whole quilt top!
I did manage to quilt the whole thing last night following The Polkadot Chair's quilting process. I chose to quilt in the seam on each row and added a second and third line to the right and left. So, each seam had three quilting lines and all were running horizontal. I chose not to do any vertical lines because I didn't want to sew through the name piece. I did end up with over 36 quilting lines no further than 4" apart, so it should be plenty to keep it together! Next on the agenda is binding it, washing it, and wrapping it up all nice and pretty before Christmas!
For now, here's what the finished quilt top looks like -- these pictures are also the most accurate in terms of what the colors look like in real life.
Assuming the last few steps go well, I will hopefully have a finished quilt to show off in the next couple days!


that looks amazing! so pretty!
ReplyDeletePretty pretty, such meticulous work, and it shows!thanks for sharing.
ReplyDeleteI love this quilt! You've done a fantastic job on it.
ReplyDeleteAwesome job! Love your brick pattern and the 'row' with her name! Thanks for sharing - I see a few of these in my future for my sweet grandbabies!!
ReplyDeleteJenn
Did a 2 person quilt-along using your pattern/tutorial. very easy and fun. Thanks!!
ReplyDeleteWhat font did you use?
ReplyDeleteThere is a problem - please update your account to enable third party hosting....
ReplyDelete