Showing posts with label baking. Show all posts

Wednesday, September 5, 2012

Fall Fever

Despite the 100+ degree temperatures still looming here in Dallas, I have already declared it Fall in my book.  With the official calendar change to September, the return of college football, and the flashing school-zone lights on my drive to work again, the past few days have undeniably felt like fall. 
I’ve been trying not to go overboard in anticipation of my favorite season of the year -- i.e. no boots or scarves just yet -- but have been adding little touches to make it feel like fall around here.
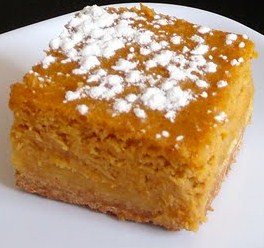
Apparently I’m not the only one who loves this time of year. Some of the girls and I at work declared last week to be ‘pumpkin treat week’ so we could bake up some of our favorite fall desserts. I went with my tried and true, always a winner, Pumpkin Gooey Butter Cakes via the butter lovin’ gal, Paula Deen.  
via
These bars are extremely easy to throw together, make the house smell amazing, and disappear in no time by pumpkin and non-pumpkin lovers alike!  Seriously, a non-pumpkin loving coworker of mine tried one and loved it.  I highly recommend them if you are craving something sweet or just want a taste of fall.
In addition to the baking, I’ve been sporting my burnt orange once again in support of my lovely Longhorns.  It was so exciting to cheer them on last weekend and I can't wait for the rest of the season -- Hook 'Em!

It's an oldie, so try not to laugh too hard at my cheesy-ness :)

Last, but not least, even my toes got a little bit of fall fever.  When I went in for a pedicure this weekend, I could not resist picking out a darker shade of purple to carry me into October!


Stay tuned for more fall changes around here -- I promise not to post anymore pics of my toes.  Here's hoping the weather catches fall fever soon! 
Happy -- almost -- fall, ya’ll!

Friday, June 1, 2012

Recipe Review: S'more Cookies

I love to cook -- well bake is probably a bit more accurate -- but I'm not super adventurous or original in the kitchen. I typically find a recipe that sounds delicious and follow it to a tee.  If I love the result, the recipe is a keeper. If not, I usually never try it again -- I'm not daring enough to try tweaking it myself.  There are so many amazing food blogs out there, so I thought every now and then it'd be fun to just share the ones I stumble across and the recipes I've tried and loved.  It should be no surprise at all that I decided to start with something sweet :)

The other night I was craving s'mores. They -- along with anything caramel related -- are among my most favorite things.  Since I am without a fireplace and it's 90+ degrees this week, I decided making actual s'mores was out of the question so I began searching for s'more related baked goods.  I started looking at cookies and it didn't take long for me to find the recipe I wanted to try from Ice Cream Before Dinner.  

I quickly ran to the store to grab marshmallows and got started right away. They were extremely easy to make and only require a minimal amount of babysitting while baking so you can push the Hershey bars in half way through.  When they were done, it took some serious self control to let them cool completely, but they were worth the wait!


This was the only photo I managed to snap before digging in!  Needless to say, these hit the spot and I'll be making them again when the s'more craving strikes -- maybe next time with a few extra marshmallows :)

Happy baking and eating!


Thursday, December 22, 2011

Christmas Cookies

This week, the boy and I spent a night baking and decorating Christmas cookies. Although I try to make this a yearly tradition, I don't have special recipes for the cookies or icing that I use each time. I usually just look around the web until I find one that sounds interesting. This year, I stumbled upon this recipe for the cookies and decided to try it because of the almond extract -- which I LOVE. Before even baking the cookies, we were in smitten! This recipe will definitely be saved and most likely become part of a yearly tradition.

For the icing, I was going to try the recipe on the same site as the cookies, but couldn't find meringue powder so I searched for a different royal icing recipe.  I found this one from Alton Brown and picked it mainly because I had all the ingredients on hand. It was so-so and probably won't be a repeat, but was really easy to throw together and definitely has not kept me from having a cookie -- or two, or three -- each night.

So, after we baked up our cookies and whipped up the icing, we chose to color a third of the icing red, a third green, and leave a third white.  Although our red looked red while mixing, it quickly turned into a very bright, hot pink!  Still looks cute on the cookies, just a little less traditional :) We put the three colors in Ziploc bags and cut a small opening in the corner so we could pipe them onto each cookie.


Boyfriend has not done this in many many years and was fascinated by the Ziploc bag trick. 


We just kept on going until we had plates full of cookies! Along the way, we 'tested' the broken or deformed ones and approved of their quality :)

To top off the Christmas-y, fun-filled night, we took the puppies and drove around looking at Christmas lights.  It was one of the most fun ways to spend a weeknight! 

Hope everyone else is getting their fill of holiday activities before they fly by!


Sunday, August 7, 2011

Too Hot to Handle


In my last post, I mentioned getting acquainted with a new-to-me sewing machine.  I even posed a challenge to myself to attempt seven projects in seven days to get me more familiar with it and push myself to try some new techniques.  Well, after drooling over some new fabrics I wanted to order and realizing I had run out of room to store them, I accepted my self-imposed challenge. I now had another, more pressing reason to accept it -- using up my current fabric stash to make room for more.
Yes, the sides are bulging -- no time to waste!
I chose to start with a simple project to get the momentum rolling and keep me motivated for the challenge to come. In my stash of fabrics, I had several scraps which had already been quilted and used for various lunchboxes.
After much debate with myself, I decided they would best be used as pot holders. They are fun and colorful which is perfect for a kitchen, they are already quilted which saves me some work, and I currently own only one oven mit and 'Ove' Glove.  Not only would this be fun and simple, it would also be practical for me.

I started by cutting squares -- approximately 8”x8” -- out of the larger pieces of fabric. Then there were the longer, thinner ones I had to work with.  I decided to go with a quilted effect to make the most out of what I had. I started piecing together 4”x4” squares or 4”x8” rectangles -- sizes vary based on what was available -- until I had used up as much of the scraps as I had left.
After I had cut enough material for 5 pot holders, I decided this was plenty and saved my last and largest leftover lunchbox scrap for another project. 
Since my scraps were already quilted, all that was left after cutting was to join the pieces together and finish the edges.  I was unsure of how to join them initially, so I started by binding my one, whole square.  I used some left over double bias tape and got to work finishing the first pot holder.
I am by no means a pro at using or even making bias tape, but this is the process I went with and it seemed to work really well.
1. open up the tape and lay on pot holder, lining up the edges with right sides together. I started in the middle of a side so I could camouflage the two ends meeting as much as possible. Pin until you get to a corner.
2. Start stitching your first side about an inch from the start of your bias tape and stop when you’re reached the corner.
3. Remove from the machine.  Pivot the outer edge of your bias tape so you can continue lining up with the edge of the adjoining side -- make sure that no inner edge is trapped under and at risk for being stitched down.

*do not pin like this*
4. Continue each side in this manner until you reach your starting point.  Fold the beginning of your bias tape in about a ¼ of an inch -- I forgot this part so the photo does not show this! Make sure your ending piece overlaps the beginning and stitch.
5. Fold the unstitched edge in towards the center of the bias tape and then over the edge of the potholder onto the other side. There should now be no raw edges exposed. Adjust the corners and pin in place.
6. Topstitch all around staying as close to the inner edge as possible but making sure to stitch though the bias tape on the backside as well.
You’re done -- and with perfectly mitered corners, I might add! I did not add any loops to mine -- I just stash them in a cabinet so there's no real need -- but you could definitely add pockets on one side for your hand to fit in or a hanging loop to the outer edge.
Now, for my quilted potholders. I decided to experiment with some decorative stitches to join each piece together. This allowed me to try something new and not have to worry about hiding seems -- which was not possible since I was using already quilted scraps. I chose a couple different patterns and just started sending two pieces at a time trough the machine.

All that was left, was to bind them and I’d have 5 new pot holders to use that were just scraps an hour earlier!

Bring on Day 2!

Tuesday, May 17, 2011

Before It's Too Late

Before it’s too far past Mother’s Day and we all start focusing on the next parental holiday, I wanted to share how I spent the day celebrating with my Mom -- and not because it was a super fabulous idea that's never been done, but simply because it involved a lot of yummy, easy recipes everyone should try!
Since I am no mother myself, I get to focus all my attention on making it an enjoyable day for my Mom.  I decided a couple weeks beforehand that I wanted to surprise her somehow. After spending a lot of time on foodnetwork.com, thekitchn.com and countless blogs, I knew breakfast would be the perfect opportunity -- it’d be a first-thing-in-the-morning surprise and give me a chance to try all the delicious brunch recipes I kept finding.  So, after I narrowed it down to the top three must try recipes, I bought all my groceries, and prepped as much as I could the day before. 
One thing to know about my mother is that she is up early. Every. Single. Day.  I suppose that’s what happens when you’ve spent countless years -- like how I didn’t give away her age? -- waking up early for work, children, and now puppies.  So, if I was going to surprise her with breakfast, I knew I’d have to get up even earlier so I could finish putting things together, load up the car, and make the 45 minute drive all before my early-rising mother ate her own breakfast.  So, I hesitantly happily set my alarm for 5:30am.
Unfortunately, when you’re not used to waking up that early, it is far too easy to simply reach over and unknowingly stop all annoying sounds -- which is what happened.  When I woke up on my own and saw the sun shining in, I immediately jumped out of bed in a panic and realized what had happened. By some small miracle, it was only 7:30, so the plan wasn’t totally lost.
I ran around like a mad woman finishing up cinnamon rolls which had to rise for 45 minutes before baking -- perfect for the car ride there -- and running to my car with all the things I needed to bring. Knowing my early rise would lead to a greater chance of forgetting things, I was wise enough to put almost everything in one large bag in the fridge the night before, along with wrapping her present, signing her card, and arranging her flowers.  I didn’t look nearly as glamorous as I had hoped for her big day, but I did finish the food prep and got the car loaded surprisingly fast considering the frantic wake up just 30 minutes earlier.
So, just an hour and a half later than planned, I was off to surprise my mother.  I got about 15 minutes into the drive when I realized I’d left the stuffed French toast!  It had to soak overnight and would not fit in the large bag with everything else, so it somehow got overlooked while I was gathering things.   Seeing as it was a third of the breakfast and pretty important to the meal, I frustratingly turned the car around to get it -- what’s another 30 minutes at this point, right?
I got back, ran up the stairs, grabbed the French toast, looked around to double check nothing else was being forgotten, and headed off once again.  Although I was late according to my own schedule, it was still early in the morning and the roads were clear allowing me to make excellent timing.  The best part of the whole morning was that despite my alarm mishap, my mother was completely surprised when I did show up and to my amazement, had not eaten breakfast yet -- at least that’s what she told me. 
After I arrived, we finished some of the baking and enjoyed this lovely feast Sunday morning.
Now, for the scoop on the delicious dishes -- we had Hazelnut Cinnamon Rolls and Mini Frittatas via the lovely and oh-so-talented Giada, along with Mixed Berry Stuffed French Toast from a blog I happened across last week.  Sadly, I cannot find the blog, so I've included the recipe below.


The French toast requires some advanced planning since it has to soak overnight and the cinnamon rolls require defrosted bread dough and need about 45 minutes of rising time. 
Other than a little pre-planning, all dishes were super easy and tasted amazing!  The mini frittatas are extremely versatile and you could add anything you have in the fridge. Ours followed the recipe, but bell peppers, onions, various cheeses or even bacon would all be great additions.  And although the recipe calls for mini muffin pans, I was feeling far too lazy to pour my egg mixture into 48 tiny spaces and opted for a regular muffin pan and just doubled the cooking time -- which did not seem to have any effect on how fast they disappeared.
So, the next time you want to surprise someone, throw a brunch, or just want to make a huge breakfast for your family, I encourage you to try all of these recipes!

Tuesday, February 22, 2011

Goldilocks and the Three Caramels

Much like Goldilocks and her three beds, I set off on an adventure to find the perfect caramel.  It is one of my absolute favorite sweet treats and I thought it would be an interesting process to make my own.  Having never attempted to make caramel -- or any kind of candy -- I was a little intimidated to get started.
First things first, I searched for the most promising recipe and came upon two that I was dying to try. The first I found was via the wonderful Ina Garten on Food Network and the second I came across while reading my favorite blog, Jones Design CompanyBoth were slightly different but each had rave reviews, so I didn’t think I could go wrong. I printed both since the ingredients were similar and figured I’d have a chance to try each at some point.
Second step, obtaining a candy thermometer -- I mentioned I’d never made candy before so one was missing from my kitchen. I got a very simple one from Sur la Table since I had a gift card to use and am trying my hardest to put more money in savings right now and less in the pockets of my favorite retailers.
Third step, pick up my ingredients. Caramel is surprisingly simple despite its absolutely amazing taste, and contains things you most likely already have on hand. The couple extras I needed were heavy cream and corn syrup.  Also, as long as you buy a little extra cream, you could make this recipe a few times before needing to restock ingredients -- either because it tastes so wonderful you ate the first batch without sharing, or you messed up once or twice.
Time to get started! Ina’s recipe is actually really great at explaining what to do, so I won’t repeat the steps. Instead, I’ll try to explain what did and didn’t work for me.   As you’ve probably guessed, it took a couple rounds for me to get it just right.
Case in point, here is my oh so sad first attempt… 
As Goldilocks would say, “OUCH! This caramel is much too HARD!” After letting it cool, I had zero luck cutting into this solid block. I even let it set out over night to get to room temperature and still failed at cutting it into pieces -- there was absolutely no way I would get half of this to roll-up.  After my first attempt I spent the day doing some caramel research. Since mine turned out to be similar to toffee in firmness, I wondered if I cooked it too long, not enough, too fast, too slow, etc.  After reading a few informative websites and comparing my recipe to a few others, I decided for my next attempt I would adjust a few things:
·         First, I think my stove’s version of ‘medium-high’ is hotter than most so I’d lessen the heat in each of my steps.
·         Second, a few recipes I read only heated to caramel to ‘soft ball’ stage which is around 240 degrees as opposed to ‘hard ball’ stage which is 248, so I decided that I had possibly over cooked my first attempt.
·         Another tip I’d come across a few times mentioned never scraping the sides or bottom of the pan when you’re pouring the caramel.  Since I was born with about ten sweet teeth, I am a chronic bowl scrapper.  I want every last drop so naturally, I scraped away when pouring my first batch. Apparently, that scraping got a few of the well done parts on the bottom of my pan.
·         Last thing I want to adjust was the pan I poured the hot caramel in. The recipe calls for an 8x8 and once it’s hardened, you cut the square in half and roll each half starting from the long ends.  Even though mine was un-cuttable, it would have been a very thick roll if I was able to do what the recipe called for.  I decided in my second attempt, I’d pour it into a 13x9 pan, cut that sheet into thirds and roll each starting from the long end.
Ok, new plan in mind, time for round two!  
I definitely think lowering my stove temperature helped this time around. When I poured the caramel, I noticed more came out and none appeared to be slightly scorched on the bottom. And speaking of pouring, I was also able to control myself and resisted scraping the pan to get all the sweet, gooey caramel -- it was a big moment.  I also was very pleased with the thickness of the caramel when poured in a 13x9. It’s definitely your preference, but this was more the size I was looking for and allowed me to make a bit extra since I plan to give some away as gifts.  
My last tweak to my first attempt was my caramel temperature. I cooked only to 240 degrees this time around and was very pleased with the color, way it poured, etc. -- it looked so promising!  Since I did my second attempt during my lunch break, I put it in the fridge to cool and decided I’d cut and roll when I got home from work.
I thought it might need some warming up when I was ready to roll, but surprisingly, it was very soft and pliable after hours in the fridge. I started to roll my first third and immediately cut myself a piece to try -- It tasted AMAZING and melted right in my mouth. I didn’t have time to cut more and wrap each right then, so I put it back in the fridge and decided I’d finish later. When I checked on it the next morning, the log I had rolled, had melted right back into a thin layer of caramel! In the words of Goldilocks, “this batch is much TOO soft!” AHHHH! It was so promising. 
Despite its non-chewy caramel texture, I was not about to let this go to waste. It certainly couldn’t be rolled and expected to keep its shape but it would pour into a bowl just perfectly. Over a week or two, I managed to find many uses for it -- dipping apples, topping ice cream, eating with a spoon -- my personal favorite -- etc.
So, second attempt a little more successful than the first, but not what I was going for -- time to re-evaluate and tweak a couple more steps in my process. For my third attempt, I decided to keep almost everything the same with one exception. I would go back to the original goal of heating to 248 but do so at a much slower pace and using the lower stove setting from the second attempt. 
I went along like normal and incorporated my new tweaks; however, during the final stage of heating, I noticed that the thermometer was stuck and had not gone up after several minutes. I decided this must be due to my electric stove which heats and turns off, heats and turns off, in order to maintain a lower temp. UGHH! The caramel was starting to look burnt and I was convinced another batch was ruined. 
 
Out of anger and despair, I poured this batch into a plastic container that I didn’t mind tossing once it had cooled.  After I’d poured it, I was surprised to find that it didn’t look nearly as burnt as it did on the stove.  I had also once again resisted scrapping the pot and had a moment of hope that maybe it would work out! I quickly poured it from the plastic container into my pan and let it set up in the fridge for a couple hours. When I went back later to cut and roll, it was soft enough to mold but not so soft that it would lose its shape. I couldn’t believe it -- SUCCESS! As Goldilocks would say, “This one is juuuuuust right.” I of course tried a piece to make sure it not only looked pretty, but tasted right. Then I tried one more to make sure I wasn’t imagining its amazing taste and texture. Then I tried one more just because the second one was so great, and then forced myself to stop trying a fourth.
After I rolled and cut all the pieces, I decided to dip half of them in milk chocolate to make a homemade milk dud -- I was told this was a favorite treat of my gift recipients.  I melted the chocolate in a double boiler, dipped half the caramel pieces using tongs and let them harden. Once they were set, I cut parchment paper into squares and wrapped each piece, securing the ends with a twist. I divided the caramel in half, reserving just enough pieces for my family to try, and put them in two cellophane gift bags. I then tied them with ribbon, added a label and placed them in Chinese take-out gift boxes I’d found a year earlier in the dollar section of Target.
They were a huge hit with everyone who tried them and despite the three tries it took to get just one good batch, I was quite pleased with the outcome.  Just remembering how great they tasted gives me the courage to try again and see if I can succeed in fewer than 3 attempts this time!

Thursday, January 6, 2011

A (not-so) Little Behind

I know it’s late but MERRY CHRISTMAS and HAPPY NEW YEAR to everyone! Ok, so the picture above is actually from last Christmas but it’s one of my favs so I couldn’t resist :)

Once again, I find myself falling behind on my blogging! As we learned in October, I’m easily distracted by life’s events and can let the blogging fall behind -- I’m trying to get better! New year’s resolution, perhaps?! Anyway, I hope everyone had a wonderful Christmas filled with lots of family and friends.  

This year, I was fortunate enough to have nearly two whole weeks off for the holidays and managed to stay busy the whole time. Here are some holiday highlights and ‘would-be’ posts during my time off -- I’ll try to keep them short and sweet with mostly pictures!

Family Christmas

Every year, our extended family gets together before Christmas day for gift exchanging and to eat lots of food! Sadly, I have no photos of our yummy desserts, but here are some present opening action shots and fun pictures of the cousins…
The boys opening their college blankets -- both winning teams this year!

Little Ivan inspecting a present as big as he is!

Sisterly love :)

My sister, Samantha, and boyfriend Jon

A handful of cousins

 Me and Adam -- his first year at Family Christmas!

All the cousins! Poor Chase is the only boy and probably thinks we’re all nuts!

It’s always so much fun when the whole family gets together -- I think we need to start inventing holidays so it can happen more often :)

Tacky Sweater Party

During the break, I also attended my very first tacky Christmas sweater party. When I heard the dress code, I was going over all the horrible sweaters my mom made us wear -- and documented with photos -- growing up, and how perfect they would be for an evening like this! Since most of the tops we wore back then were large enough to be ‘dresses’ worn with leggings or stir-up pants, I was certain I could fit into at least one as an adult. Unfortunately, tacky Christmas sweaters were not considered sentimental in my book, and I could not find a single one in the attic.

Also, with the recent popularity in these silly parties, I knew finding one second hand would not be easy and I had no desire to pay full price for one in the ladies department at the mall. So, I decided the only way to participate was to make mine -- and Adam’s since he’d also never attended one. Luckily, my Aunt had been cleaning out her sewing supplies just before Thanksgiving and brought me several Christmas fabrics and Christmas themed appliqués she no longer thought she’d use. I decided they’d be perfect on our sweaters and could be easily embellished with some tacky items at the craft store. I bought us each a sweater at Target for around $10, glitter paint and a few ‘tacky’ embellishments from the fabric store, and Ta-Da! Two tacky Christmas sweaters ready for a party…

The front -- minus glitter puff paint and embellishments

The back -- also minus the tacky embellishments

Adam’s front all completed and tackied out!

And the back sans music notes and glittery puff paint -- I didn’t do the best job of taking pictures.

Once at the party, I discovered home-made was the way to go! Here are the girls and I with 75% home-made sweaters. Kelly’s also went a step further and had working lights adorning a Christmas tree on the back -- good ideas for next year already brewing!


Thanks Chris and Betsy for putting on such a fun party!

Yummy Baking

One of my favorite things to do is bake and this year, I had lots of time to make some tasty treats. One new adventure was caramel making -- more on the successes and failures of that another day -- and did manage to get one amazing batch! I dipped half in milk chocolate like a home-made milk dud but a million times better -- and kept the other half plain. Unfortunately, all but a handful were given away as gifts…

I wrapped each individually in parchment paper and put them in clear goody bags tied with a green ribbon and labeled with a cute Christmas tags -- those adorable pictures seem to be missing.

I also made one of my favorite holiday treats -- FUDGE! I brought some to work, gave some away, and still had a lot left over, which I unfortunately could not resist eating. One of my favorite fudge give-aways was to the groomers.

They are so sweet to Shiloh and Nolan every time I bring them in, so I thought they deserved a sweet treat and a cheerful, puppy friendly, Christmas card to say thank you.

I actually received a call yesterday from the owner of Lucca Bella -- what a cute groomers name! -- saying how much they enjoyed the fudge and asking for the recipe the next time I bring the pups in. In fact, every time I make it, I find myself sharing the recipe, so I thought I’d post it here for anyone to try.  It really is the easiest, tastiest fudge and impossible to mess up!

4-Chip Marshmallow Fudge

¾ c. Butter
14-oz can Sweetened Condensed Milk
3 T. Milk
12-oz. package Semi Sweet Chocolate Chips
10-oz. package Peanut Butter Chips
12-oz. package Milk Chocolate Chips
1 c. Butterscotch Chips
7-oz. jar Marshmallow Cream
1 ½ tsp. Vanilla Extract
½ tsp. Almond Extract

Melt butter in a double boiler. I don’t have one so I place a glass bowl on top of a saucepan to keep the ingredients from burning. Stir in condensed milk and milk. Add chips and stir constantly until fully melted. I usually do one type of chip at a time to make it a little easier to stir and melt. Remove from heat and stir in marshmallow cream and extracts. Pour into 15” x 10” baking pan. Refrigerate until firm then cut into squares. Makes 3 dozen.

Three dozen is not an exaggeration -- it seriously makes a ton! Hope you try it and enjoy!

My other dessert adventures included lemon bars -- which I love all the time -- and sugar cookies, perfect for the holidays. Unfortunately, I left the dough in the fridge for too many days and by the time we were able to roll it out, it was too hard to use.  I’ll just have to try another day!

Christmas Day

Since we do our big family Christmas early, Christmas day is typically low key in our home. We wake up, make some coffee, watch the puppies open presents -- yes, before the humans -- then we open presents, cook breakfast, relax, watch football, cook dinner, and relax, watch football!  This year was not much different except I left after breakfast to spend part of Christmas day with Adam and his family. We had a huge, delicious lunch cooked entirely by his grandmother, opened presents and played a game invented by his mom.  After all the fun and food, we came back for games and more food!
 
Puppy stockings! They get treats to keep them occupied for a while; however, with 6 dogs in the house this year, some growling and treat stealing took place!

Christmas cheer! From left to right: Shiloh, Bentley, my sister, Jon, Nolan, me Adam, Bella, and Rue -- the newest member of the family and Adam’s new best friend :)

The cutest boy that ever lived -- after a hard day of treats, presents, and playing!

Sorry for the never ending post and millions of pictures! I’ll try to make the next few shorter :)

Happy New Year!!