Showing posts with label pillows. Show all posts

Monday, February 13, 2012

My Growing List

Whoa! It's been a crazy, hectic, busy couple weeks around here. This is one of those times of the year where work seems to really inhibit my creative time and I end up spending more time compiling a list of future projects and no time actually completing them. I'm hoping things will start to slow down next week -- I know they won't be back to normal, but I'll take slower for now -- because I've got a whole list of things I want to start tackling!

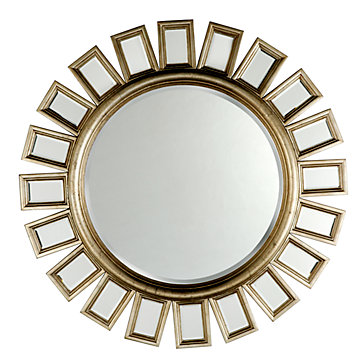
For example, I've been searching for the perfect mirror to hang above my bed but can't seem to find exactly what I want in my price range.  These are a few I've considered, but somehow just can't bring myself to spend the money -- I guess that's a good thing, right?!

ZGallerie - Devon Mirror - $199


Kirkland's - Bronze Fan Mirror - $109
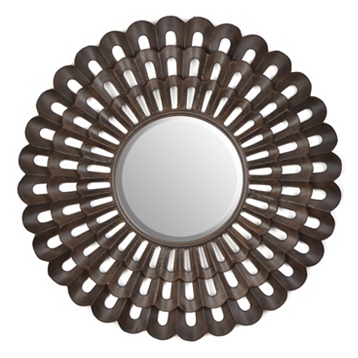

Kirkland's - Chloe Floral Mirror - $119
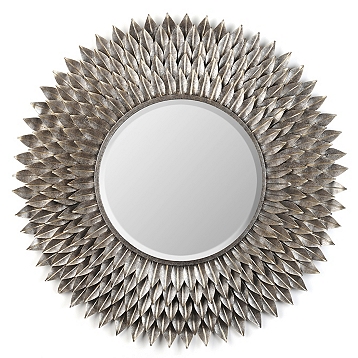

Ballard's - Bellesol Mirror - $169

Bellesol Mirror

I've also been scouring Hobby Lobby, Home Goods, etc. for some good sales, but still can't find exactly what I want. The price is either wrong, or it's too small, or the wrong finish -- which I know can be fixed, but who wants to do that when you spend money on something brand new?! -- too much mirror, too pointy -- I'll let you take a wild guess which one that might be :) etc. 

So, last week while I was doing some lunch break blog reading, I came across Katie's DIY starburst mirror and decided I'd just have to make my own!  Assuming it's a success, it would solve all my problems since it'd be completely custom.  I'm debating between her method, which I love because it's more solid and chunky, or this one, or this one.  Whichever I end up choosing, I've thought of ways to tweak it to suite me more and once decided, will begin gathering my supplies. So, here's one project that has officially been added to the to-do list!

Something else on the list for a while now is to finish up the dog crate makeover of way back when. Now that the crates are more prominently displayed in the living room, I'm dying to get some fabric on them, I just can't decide exactly what I want.  I'm leaning towards something more neutral like a geometric grey and then I can add some fun new crate pillows for a pop of color -- which I guess also means there's another project on the to-do list.

Waverly Cross Section Charcoal  Dena Fishbein - Taza - Ribbon Damask in Neutral

And, along the fabric discussion, I still need to find something fun to cover the plain white storage boxes in my craft nook along with the cork board and lamp shade.  I'm apparently leaning towards yellow...

Lotta Jansdotter - Echo - Standing Stones in Yellow Lotta Jansdotter - Echo - Standing Stones in Teal Amy Butler - Midwest Modern 1 and 2 - Martini in MustardDena Fishbein - Taza - Ribbon Damask in Yellow Joel Dewberry - Heirloom - Blockprint Blossom in Dandelion Lizzy House - Outfoxed - Pearl Bracelet in Yellow

Along with the DIY home decor things, I have a handful of sewing projects I want to get started on. I've had fabric for an infinity scarf, bed pillows, and couch pillows for months now and I'm dying to turn my stack of 30+ old sorority shirts into a t-shirt quilt. Speaking of quilts, I also bought some Christmas fabric on sale after the holidays with the intention of making myself a Christmas quilt. I haven't officially decided what I'm going to do with it, but I figure it's never too early to start!

Also on my list -- as of this morning -- is to try an upholstery project similar to this boxed ottoman.  I don't need something this large, but I'm thinking two smaller ones in my bedroom would be perfect! Ikea even sells these small side tables that are cheap enough that I'd have no guilt immediately tweaking them.  I am a beginner upholster-er -- as in never tried it, beginner -- and an average sewer so this could either be a total disaster or my biggest accomplishment thus far :)

Hopefully work starts to slow down soon and I can find the time -- and energy -- to cross some things off my list before even more get added!  Now, which to pick first...


Thursday, January 26, 2012

Scrabble Tile Pillows

I'm trying to keep my promise and get some 'how-to's up for previous projects I've completed -- first on my list are the scrabble tile pillows. 


I mentioned before that they were a recent gift for boyfriend and a way of testing something I've never tried before -- beginner applique.  I knew boyfriend wouldn't mind -- or probably even notice -- if they weren't perfect, so it was a great little test run.  Here are the supplies I used...


*Neutral/Tile colored fabric for the pillows -- how much depends on the size you want to make. My pillow forms were 16"x16" so each of my pillow fronts and backs needed to be 17"x17", using a 1/2" seam allowance
*Black Fabric -- for two pillows, a 1/4 of a yard was plenty
*Zipper -- I used 12" because it's what I had on hand
*Heat 'n Bond
*Computer/Printer for letter design
*Coordinating Thread for pillows and letters
*All your other sewing goodies -- rotary cutter/scissors, cutting mat, clear ruler, etc.

I started by printing out my letters. I work best in PowerPoint so I just typed the letter I wanted and it's corresponding point value and re-sized until it was the height I desired. You can see from the picture below, mine were about 9"-10" tall by how much of the page they take up.  You don't have to worry about placement of letters and numbers because you can arrange those on the fabric later. 


A note about printing: If it's possible, print the mirror image of the letter because it will make things easier in the next step.  I could not find that setting on the three printers I tried -- home, and 2 work -- so I just had to get a little inventive.

Once you have the letters and numbers printed out, it's time to trace them onto the heat 'n bond.  When tracing them, you want them to appear backwards, so if you've printed out the mirror image, it will be as simple as tracing your printout onto the rough side of the heat 'n bond. If not, you'll need to use lamp and glass or a window so you can flip your letter over and trace it onto the rough side of the heat 'n bond backwards.  I used a lamp with a piece of glass over the top.  Just be sure to trace quickly or pick up the glass every couple minutes so you don't initiate the 'heat' process too early :)


After you've traced them, roughly cut out each letter and number.  Then you want to place them -- still facing backwards -- onto the wrong side of your fabric. Peel off the back side and press them into place.


Once they're fused to the fabric, and cooled for a minute or two, cut them out following your tracing lines.  Now you can flip them over and the black fabric should be facing you and reads correctly, but still have paper on one side, which is now the backside.

Set your letters aside for a minute and cut 2 pieces of your tile colored fabric to the desired pillow size -- remembering to add 1" for your seam allowance.  Now grab one piece for the front and arrange your letter and number how you want. I used my clear ruler to help me center the letters and make sure they didn't appear wonky.


Once they're in place, peel off the paper on the backside and press to permanently adhere them.


You could stop here and go on to make your pillows, or choose to stitch/applique the letters.  I chose to do a zig-zag stitch around the edges of the letters and a straight stitch on the numbers since they were pretty small.  Here are the settings I used for the zig-zag stitch.


This was the new part for me and I wanted practice following different shapes. I had an easier time with the 'Q' than the 'A' but it could have been because it was second.  I discovered that when starting, it's best to place your needle down just on the outside of the black letter and in the tile fabric.  This is also true when pivoting around a corner or curve. If you keep it close to the letter but just on the outside, the stitch looked more professional. You can see below that I started at the top with my needle in the letter and the thread carried too far into the tile, making it look uneven and kind of 'hairy'.  By the time I got to the inside of the 'A' I had learned from that mistake and the majority of my stitching is on the black fabric.


Once you've made it around each letter and number, the fronts are done and you can move on to assembling your pillow however you choose. I decided to use zippers, but you could make a simple envelop back as well.  Also, since mine was a test run for another project and not adequately planned for, I didn't have enough fabric for my pillow backs. Luckily, I had something similar in color that ended up dressing the pillows up a bit.


Add your pillow form or stuffing, and you're all done! 


If they're gifts, better wrap them quickly before someone else falls in love :)  Maybe I'll have to make an 'S' pillow for little Shi one day...


Linking up at...

Katie's Nesting Spot
Featured On The  Crafty Nest