Thursday, January 26, 2012

Scrabble Tile Pillows

I'm trying to keep my promise and get some 'how-to's up for previous projects I've completed -- first on my list are the scrabble tile pillows. 


I mentioned before that they were a recent gift for boyfriend and a way of testing something I've never tried before -- beginner applique.  I knew boyfriend wouldn't mind -- or probably even notice -- if they weren't perfect, so it was a great little test run.  Here are the supplies I used...


*Neutral/Tile colored fabric for the pillows -- how much depends on the size you want to make. My pillow forms were 16"x16" so each of my pillow fronts and backs needed to be 17"x17", using a 1/2" seam allowance
*Black Fabric -- for two pillows, a 1/4 of a yard was plenty
*Zipper -- I used 12" because it's what I had on hand
*Heat 'n Bond
*Computer/Printer for letter design
*Coordinating Thread for pillows and letters
*All your other sewing goodies -- rotary cutter/scissors, cutting mat, clear ruler, etc.

I started by printing out my letters. I work best in PowerPoint so I just typed the letter I wanted and it's corresponding point value and re-sized until it was the height I desired. You can see from the picture below, mine were about 9"-10" tall by how much of the page they take up.  You don't have to worry about placement of letters and numbers because you can arrange those on the fabric later. 


A note about printing: If it's possible, print the mirror image of the letter because it will make things easier in the next step.  I could not find that setting on the three printers I tried -- home, and 2 work -- so I just had to get a little inventive.

Once you have the letters and numbers printed out, it's time to trace them onto the heat 'n bond.  When tracing them, you want them to appear backwards, so if you've printed out the mirror image, it will be as simple as tracing your printout onto the rough side of the heat 'n bond. If not, you'll need to use lamp and glass or a window so you can flip your letter over and trace it onto the rough side of the heat 'n bond backwards.  I used a lamp with a piece of glass over the top.  Just be sure to trace quickly or pick up the glass every couple minutes so you don't initiate the 'heat' process too early :)


After you've traced them, roughly cut out each letter and number.  Then you want to place them -- still facing backwards -- onto the wrong side of your fabric. Peel off the back side and press them into place.


Once they're fused to the fabric, and cooled for a minute or two, cut them out following your tracing lines.  Now you can flip them over and the black fabric should be facing you and reads correctly, but still have paper on one side, which is now the backside.

Set your letters aside for a minute and cut 2 pieces of your tile colored fabric to the desired pillow size -- remembering to add 1" for your seam allowance.  Now grab one piece for the front and arrange your letter and number how you want. I used my clear ruler to help me center the letters and make sure they didn't appear wonky.


Once they're in place, peel off the paper on the backside and press to permanently adhere them.


You could stop here and go on to make your pillows, or choose to stitch/applique the letters.  I chose to do a zig-zag stitch around the edges of the letters and a straight stitch on the numbers since they were pretty small.  Here are the settings I used for the zig-zag stitch.


This was the new part for me and I wanted practice following different shapes. I had an easier time with the 'Q' than the 'A' but it could have been because it was second.  I discovered that when starting, it's best to place your needle down just on the outside of the black letter and in the tile fabric.  This is also true when pivoting around a corner or curve. If you keep it close to the letter but just on the outside, the stitch looked more professional. You can see below that I started at the top with my needle in the letter and the thread carried too far into the tile, making it look uneven and kind of 'hairy'.  By the time I got to the inside of the 'A' I had learned from that mistake and the majority of my stitching is on the black fabric.


Once you've made it around each letter and number, the fronts are done and you can move on to assembling your pillow however you choose. I decided to use zippers, but you could make a simple envelop back as well.  Also, since mine was a test run for another project and not adequately planned for, I didn't have enough fabric for my pillow backs. Luckily, I had something similar in color that ended up dressing the pillows up a bit.


Add your pillow form or stuffing, and you're all done! 


If they're gifts, better wrap them quickly before someone else falls in love :)  Maybe I'll have to make an 'S' pillow for little Shi one day...


Linking up at...

Katie's Nesting Spot
Featured On The  Crafty Nest

Monday, January 23, 2012

Sewing Nook Makeover -- Gettin' Organized

All last week -- taking it one day at a time after work -- I managed to get all the touch-ups completed on the china hutch turned craft storage. This included fixing the door I accidentally screwed through, sanding, priming, painting, and sealing the back piece, then covering it with fabric, and eventually nailing it into place.  It's hard to tell in pictures, but the fabric I chose has a very subtle grey dot, which ties in with the newly painted grey desk perfectly.


I have yet to reattach the doors because I want to attempt a hinge makeover. I read about a product called Rub 'n Buff that is supposed to work on metal and I think with a little elbow grease, I can get the hinges to match the new hardware a little better.  I'll let you know how those turn out as soon as I get started.

The lack of doors did not stop me from moving right on to organizing though. I have been waiting weeks to get to this part!  After a trip to The Container Store, I came home with three desktop files, three DVD boxes and three photo boxes.  Finding concealed storage was actually a bit tricky because the china hutch is not very deep -- just 9 1/2 inches on top -- and the dividers on the front constrain the length. I found desktop organizational items to be the best fit because they allowed me to take advantage of the height and most weren't too deep.


 I also grabbed a few other items I already had and planned to use and started to layout the shelves.


When I was happy with the placement, I went all over the apartment and started gathering everything I hoped would fit in this one place. I emptied old storage bins and started grouping items to see how much space they would need. Box by box, the floor started to clear up and the baskets started to fill up.  I tried to keep similar things -- such as office supplies, sewing supplies, craft supplies, etc. -- on the same rows and the most commonly used items as easy to get to as possible. By the end, I was able to store sewing, craft, scrapbook, camera, paints, and even computer items in this area.  My laptop even fits in my desk drawer! 


After moving everything to one spot, I now have so much extra space in my closet and bedroom -- I feel a total apartment re-organization is in the near future :)

But back to the craft nook -- there are still a few more changes I plan to make in here. I am not a fan of so much solid white, so I have ideas for sprucing up the storage bins to add a bit more color.  I'd also like to add some fabric to the lamp shade and the cork board so they aren't as 'blah' as they are now.  Then there is always fabric that needs to be added to those high-water curtains, a rug for the floor and of course, a chair to sit at!  So much accomplished but still so much I want to do... In the meantime, I am loving the extra storage and plan to sit at a tiny, unstable stool just so I can get working in here :)

Monday, January 16, 2012

Sewing Nook Makeover -- Painting

Progress -- more specifically, painting -- has been slow going on the sewing/craft nook makeover, but things are finally starting to come together! This is especially exciting because the level of un-organization is really starting to get to me and I have at least 5 things lined up on my sewing to do list that I'm anxious to get started on -- Katie, yours is at the top of my list! 

As of this morning, the nook is looking like this...


It's a tad bit messy but I see it as a vast improvement over the 'doors-and-drawers-everywhere-drying' look I had going on just a few days ago.  Several things to note in that picture: first, the desk is totally complete and finally in working order, just need to find a chair to sit at so I can start sewing again! second, the new hardware has been installed -- yay! and a BIG THANKYOU to the boy for drilling all those new holes! third, the doors need to be reinstalled and fourth, the back to the china hutch is still untouched and unattached.

First things first, the painting. My strategy basically consisted of a lot of online research -- mostly reading through posts such as this and this from some of my favorite DIY bloggers -- and talking to the wonderful people at home depot when I purchased supplies.  Since this was my first painting adventure and I am by no means talented in this area, I'll keep my description of the process to this: I removed all doors, drawers, and hardware, filled necessary holes with wood filler, sanded everything with medium grit sandpaper, de-glossed every surface, primed, painted (x3), added a protective poly coat (x3), reinstalled new/old hardware, and put drawers and doors back on.  For each of those steps, I simply followed the directions on the bottle/tub/can to find out the best application process or tool to use and proper drying times.  I followed the same steps for the desk and china hutch, just using different paint colors. 

When it was finally time to add the hardware, I was equally excited as I was scared.  After all that work, the last thing I wanted, was to drill a hole in the wrong place or have things not level and even with one another.  I decided the most fool-proof method was to make a template and have the boy do the drilling -- of course he didn't mind since it meant he could use power tools :) 


Template may actually imply something fancier than I used -- I simply traced one of my drawer pulls onto a piece of card stock, and found the center of each circle.  I then measured on each drawer or door to find the proper placement, secured the template with painters tape, and the boy drilled right through the center.  When it came time to attach the handles, all were spaced perfectly and they appear to be even with one another!


After making it through that exciting/scary step, I was eager to get the doors put back on. When I removed all the old hardware, I kept everything in a bag in case pieces needed to be reused.  I tried for days -- on foot and online -- to find nickel hinges to replace the old brass ones so they match the new drawer pulls, but had no luck. Apparently, the half circle hinge in size 1 3/4" is not popular these days.


After accepting hinge defeat, I decided to put the old brass ones back on and hope it isn't too noticeable. If it does bother me, I can always attempt to spray paint them later on.  So, while the boy was finishing the new drawer pulls, I started reattaching the old hinges and the doors.  With the first one in place, I proceeded to close it to make sure the fit was right and to my horror, found this...


I must have been too eager to even notice that the old screws were two different sizes -- a longer one that fits into the china hutch and a slightly shorter one for the doors.  I felt utterly defeated.  Knowing I would have to go through the painting process once again on this door, I angrily removed it and the hinge and called it a night. Despite the set-back, I'm hoping to get the other doors attached soon -- triple checking screw sizes -- and start filling it up! I figure I can handle one missing drawer for a couple days :)

Along with correcting the door, I have to decide on what to do with the back.  I bought some fabric that I want to line it with, but when I draped it over, I noticed you could see the wood paneling showing through. Right now I'm deciding between painting it and then adding the fabric, or simply getting a solid piece of white fabric to attach underneath.  The double fabric option seems to be the fastest solution, but down the road, I may appreciate having the back painted the same as the rest of the hutch in case I decide to scrap the fabric -- pun intended :)  I suppose it won't be too much more work since I'll have the paint out for some hinge mishap corrections. So, you know what I'll be doing this week -- fingers crossed that I'll be done in just a few more days!

Thursday, January 12, 2012

Holiday Happenings, Part 3

I mentioned in July that I was starting a Christmas puzzle. It's a tradition we do each year in our family and I thought it'd be fun to slowly get my own collection of puzzles started.  I did finish it during the summer, but since it was meant to be glued and displayed for the holidays, I thought it'd be appropriate to show it off now. And of course, it wasn't as simple as put puzzle together, glue puzzle, and frame it, so here's the run-down of what happened.

Before many of the pieces found their mate, the sprawled out puzzle had a tough time fitting on my little table. I feared then that the puppies would quickly devour any piece that fell on the floor since they're used to tasty food crumbs falling in that general area, and sadly, I was correct.  By the end of the puzzle, two pieces were quite obviously missing.


I found some teeth marks on one piece I rescued from the floor, so I'm positive the puppies enjoyed chewing on them and pretty certain they were the culprits behind the two missing pieces.  Since the spots were in such obvious places, I knew if I wanted to keep it, I'd have to try and create my own pieces to disguise the holes, or order a new puzzle and sort through each piece until I'd found these two.  As a family, we have done this before, and I was not looking forward to doing it once again. 

So as I was cleaning one day, I picked up the puzzle box, and noticed the front did not show the entire picture, rather it was zoomed in on a spot. And not just any spot, it happened to be zoomed in on the area where my two pieces were missing!  I brought it near the puzzle to see how the sizing was, and you can see by looking, they were pretty exact.


I decided to cut the top of the box so I could flatten it and see how the colors would look if I somehow used them to fill in the missing pieces -- lucky for me, the missing pieces were hardly visible!


With the top positioned under the puzzle holes, I started to trace the missing shapes.


I cut out each piece slightly larger than I traced so it'd be snug fit -- as if it were a real puzzle piece -- and then used a wet cloth to wipe away the trace lines.  The pieces were cardboard, thanks to the box, but not quite as thick as the other pieces. I contemplated backing them with something, but figured once it was glued, they'd stay in place like all the rest.


Here they are filling the missing holes and wouldn't even be detected without those circles highlighting their spot!


Once I was happy with how they looked, I started gluing it together. I placed it on a white poster board and applied two layers of Mod Podge and let it dry completely.  With the white poster board on the back, it'll be easy for everyone who helped put it together to sign their names -- which has always been part of our tradition.  It's always fun to go back and see how handwriting has changed and what the little messages are each year. To keep them in order, we always date the front as well. 


I didn't have a chance to frame it before the holidays, so next up is looking for a frame sale so I can get it completed.  For now though, I am content knowing I have officially started a Christmas puzzle tradition of my own! Hopefully I can keep it going year after year like I did growing up :)

Wednesday, January 11, 2012

Holiday Happenings, Part 2

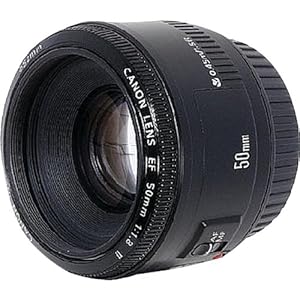
For Christmas this year, my sister got me the Canon  EF 50mm f/1.8 II Camera Lens -- how did she know it was exactly what I wanted?!  :)
 
It's perfect for all the close-up shots I like to take while I'm working on projects and around the holidays, it's great for creating the popular bokeh effect.  So, before taking my tree down, I decided to give it a try and came up with some fun photos.


I placed a small stool about 8 feet in front of my tree and grabbed any object close by to set on top. I took some photos during the day and some at night and think I like the effect at night better.


I even tried to get some of the puppies while I was at it. Shiloh didn't mind having to sit on the wobbly stool too much -- I know she needs a haircut and a bath! -- but Nolan just wasn't having it.


With a little more practice, maybe I can get the puppies to cooperate for next year -- and plan better with some freshly groomed little ones!

As for me and my new lens, I'm in love and using it daily -- thank you Samantha!

Tuesday, January 10, 2012

Holiday Happenings, Part 1

While looking through some recently uploaded photos, I realized there are a few holiday related items I never shared -- I think all the painting right after Christmas distracted me.  Although it's nearly mid-January, I figured this would be the last chance to elaborate before you think I'm a total weirdo for talking about such things.  First up is a rundown of all the gifts I decided to make by hand this year.  I've never made so many in one year before and I'm pretty shocked and slightly proud that I got them all finished on time.  I showed a sneak peak just before Christmas, so I thought I'd share the actual gifts and tutorials now that they're all given out and I can't ruin any surprises.

My sister had asked for some make-up brushes this year, so I thought I'd get those for her and go one step further and make her a brush roll-up to store them in. I did some google tutorial searching and came across this step by step tutorial from Sew4Home. I choose this one because 1) it looked nice, 2) the dimensions fit the brushes I'd purchased, and 3) it would give me a chance to practice my binding skills since I'd be doing it on a quilt very soon.  The rounded corners gave me a bit more trouble than I'd expected and I need more practice with that, but overall, I'd say it turned out pretty well.


 Folds up neat and tidy...


Plenty of storage for any brush you could ever own...


 And different sized compartments if you had anything larger to add in...


Once I finished the roll-up and had extra fabric to use, I decided no brush roll-up would be complete without a matching make-up case. I did more google research and came across this awesome tutorial by Skip to My Lou.  It's the perfect size to store all of my sister's make-up and her new brush roll-up.


Now that those were done, I moved on to dog collars and leashes.  My sister has been begging me to make her two puppies OU themed collars and Christmas seemed like the right time to finally give in and whip some up.  I've been making collars and leashes by just mimicking ones I already owned.  One day, I will try to get a step-by-step post up including where you can find all the necessary hardware. For now though, here are my OU themed collars for little Bentley and Bella.


There are three collars in the pic above -- Boyfriend's grandmother loves red and has a sweet little Maltese, so she got her very own collar and leash set as well. My sister likes to walk her two on the same leash and use a split lead to hook on each of their collars so by the end, I had actually made three collars, two leashes and one split lead.


And here are Bentley and Bella modeling their new gifts.  Somehow I had some extra time before Christmas to make a little bow tie for Bentley and a flower for Bella and Angelina. All of them have snaps and can easily be removed.


This next gift was made around Thanksgiving, but I figure it's close enough to the holidays to count :)  They were made for and inspired by boyfriend's love for Words with Friends...


I caught Shiloh snuggled up by them at one point and it spurred a whole puppy photo shoot -- I'll spare all the pictures I have and just share a couple.


Here's little Nolan.  The look on his face says, "Seriously, that black thing pointed at me again... can I just be done?!"


And then little Shi, who's always been so good at posing as long as you make a high-pitched noise right before snapping the pic.


This was another project that I made up as I went and put together as practice before making the quilt -- I used a similar technique when I attached the name on the quilt. So, it is on the list for a follow up 'how to' post.

And last, but certainly not least, was the quilt for boyfriend's niece. I shared my process in an earlier post but had not quilted or bound it yet. For me, the quilting was a little frustrating but the binding went surprisingly well -- originally it was the part I was most afraid of!  I followed instructions from The Polkadot Chair's quilt-a-long for the quilting part and will definitely be doing the same on the next one. For the binding, I found these instructions and they worked perfectly for me!


Since she's only 3, I put together this patch on the back so she'll remember when she received it.


Santa actually brought her a pink princess bed for Christmas so the quilt was gifted at the perfect time!  I am so pleased with it and ready to make more -- just need a little time to rest my sewing hands :)


linking up to The Polkadot Chair